A remastered version of the original 2019 Windows Virtual Desktop getting-started guide, updated to explain the modern Azure Virtual Desktop deployment model.

This post started life during the original Windows Virtual Desktop launch wave in 2019. At the time, the service used the classic WVD control plane, separate tenant constructs, consent pages, and the Microsoft.RDInfra.RDPowerShell module. That is not how you should deploy the platform today.
The modern service is Azure Virtual Desktop. The architecture direction is still recognizable, but the operational model is now much cleaner. New deployments are built as Azure resources, managed in the Azure portal, governed with Azure RBAC, and accessed with Windows App rather than the old launch-era experience.
What mattered in 2019
The original Windows Virtual Desktop launch mattered for three reasons.
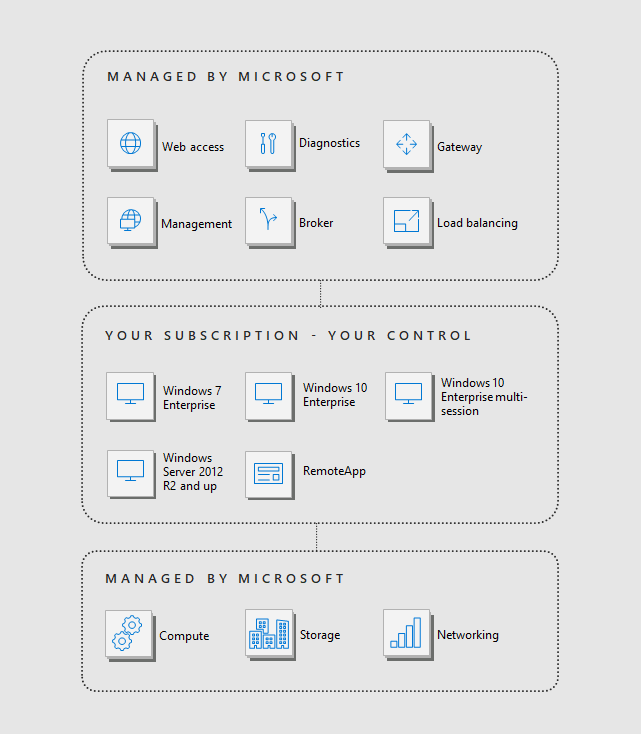
First, Microsoft took over the brokering, gateway, diagnostics, and web access service components that previously sat inside customer-managed Remote Desktop Services designs. That reduced a large amount of traditional RDS infrastructure overhead.
Second, the service introduced Windows 10 Enterprise multi-session, which materially changed the economics of Microsoft-hosted desktop virtualization for many environments.
Third, the FSLogix acquisition gave Microsoft a stronger profile and application-masking story right when the service needed it.
That is why the original article resonated. The business case was real. The part that aged out was the deployment method.
What changed in Azure Virtual Desktop
The big shift is the move away from the old classic WVD service model into Azure Resource Manager.
If you deploy Azure Virtual Desktop today, the logical building blocks are:
- A host pool.
- A workspace.
- An application group.
- Session host virtual machines.
- User or group assignments to the application group.
That sounds simple because it is supposed to be simple. The old consent page, tenant-group model, New-RdsTenant, Get-RdsTenant, and Get-RdsSessionHost flow belongs to the original WVD era and should now be treated as archive context only.
Start with the prerequisites that still matter
The original post spent a lot of time on the 2019 setup steps. In 2026, the more useful framing is to focus on the design prerequisites that still drive success.
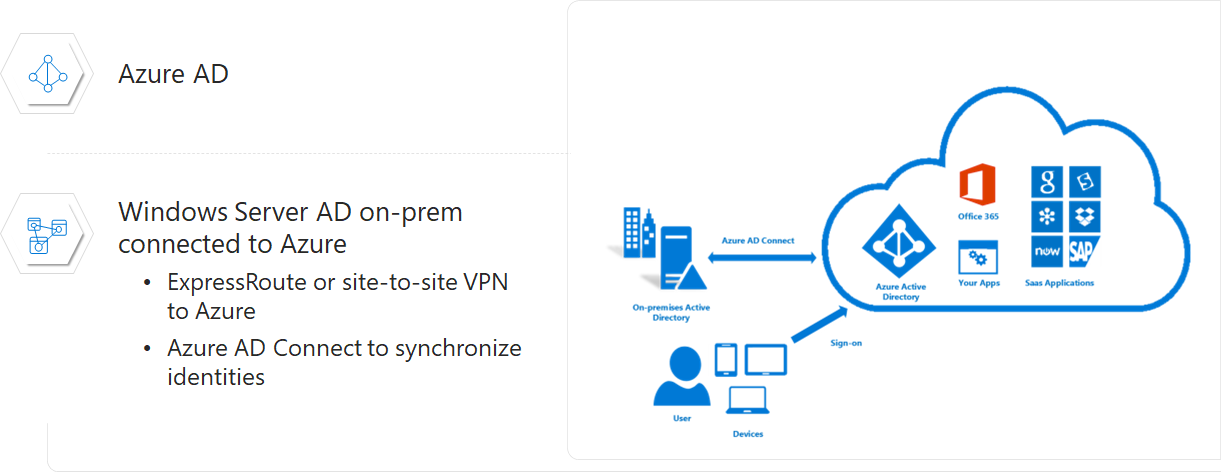
Identity
Azure Virtual Desktop always uses Microsoft Entra ID for user authentication. The session hosts themselves can be joined to:
- Active Directory Domain Services
- Microsoft Entra Domain Services
- Microsoft Entra ID
That is a major difference from the original WVD launch period, where hybrid identity assumptions were much narrower.
If you use Microsoft Entra joined session hosts, you remove the need for line-of-sight to a traditional domain controller just to deploy and access the desktop estate. That can materially simplify greenfield environments and modern cloud-first designs.
There are still some important design details:
- If you use AD DS or Microsoft Entra Domain Services, session hosts need line-of-sight to the domain and DNS.
- If you use FSLogix with Microsoft Entra joined session hosts, profile storage design still matters. Azure Files and Azure NetApp Files are the key patterns Microsoft documents.
- If you use Microsoft Entra joined VMs without session host configuration, you need the additional Virtual Machine User Login role for users who sign in to those VMs.
Networking
The network model is also easier to explain now than it was in 2019.
Azure Virtual Desktop uses a reverse connect architecture, which means you do not need to open inbound port 3389 to the session hosts. That is still one of the most important architectural advantages of the platform.
What you do need is:
- A virtual network and subnet for the session hosts.
- Connectivity from session hosts to domain controllers and DNS if you are using AD DS or Microsoft Entra Domain Services.
- Outbound access over
TCP 443to the Azure Virtual Desktop service URLs. - Connectivity to Microsoft 365 endpoints if your users need Microsoft 365 apps and services inside the session.
The original screenshots and diagrams are still useful as historical context, but the practical deployment success criteria are now much more about identity, outbound connectivity, and management model than about the old WVD onboarding workflow.
The current deployment path
If I were explaining this to an architect starting fresh today, I would frame it like this.
1. Register and prepare the Azure side
Make sure the subscription is ready for Azure Virtual Desktop, including the Microsoft.DesktopVirtualization resource provider and the correct RBAC roles for whoever is building the environment.
The current deployment workflow is no longer a sidecar service setup. It is normal Azure resource deployment.
2. Choose the host-pool operating model
Decide whether you need:
- A pooled host pool for user concurrency and density.
- A personal host pool for dedicated desktops.
Also decide whether you want the standard management model or the newer session host configuration approach for pooled Azure-based host pools.
3. Create the core Azure Virtual Desktop resources
The canonical deployment order is:
- Host pool
- Workspace
- Application group
- Session hosts
- User assignments
You can complete the whole process in one guided portal workflow, or build the components separately with Azure CLI or Azure PowerShell.
4. Pick the right session host identity and image strategy
This is where many good or bad decisions are made.
Choose:
- The join type: AD DS, Microsoft Entra Domain Services, or Microsoft Entra join
- The session host image
- The network placement
- The management path, including whether Intune is part of the design
That design work matters more than memorizing wizard screens.
5. Publish access through application groups
Users do not get access simply because the host pool exists. They need assignment to the correct application group, and that application group must be registered to a workspace so the resources appear in the feed.
For most environments, assigning groups rather than individual users is the cleaner long-term operating model.
What to retire from the original guide
The following parts of the 2019 post are now historical only:
- The old WVD consent page
- The
Microsoft.RDInfra.RDPowerShellmodule Add-RdsAccountNew-RdsTenantGet-RdsTenant- The classic tenant group concept
- The early launch portal assumptions around WVD-specific onboarding
Those steps were real for the first service release, but they are not the path for new Azure Virtual Desktop deployments.
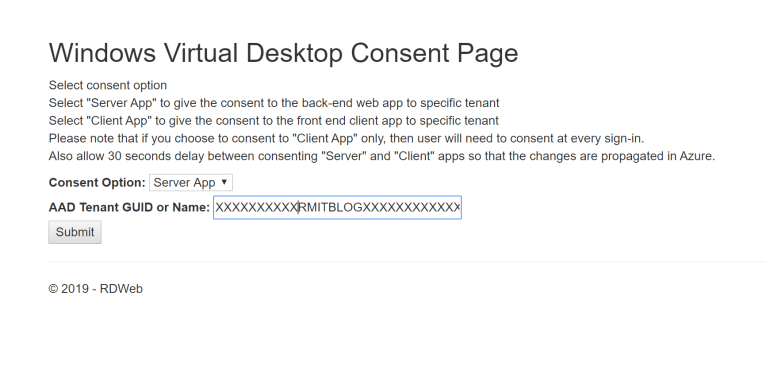
That is the most important reason this article needed remastering. Without that context, an otherwise useful archive post becomes actively misleading.
How users should connect now
The client story also changed.
For Azure Virtual Desktop today, the preferred client is Windows App. Microsoft positions it as the replacement for the older Remote Desktop client experience for Azure Virtual Desktop. Web access is still available, but the old WVD-specific client framing from 2019 is no longer the best lead.
If you are modernizing an existing environment, it is worth treating client strategy as part of the remaster:
- Use Windows App as the default recommendation.
- Keep web access as a fallback or convenience option.
- Do not point users to MSTSC or legacy RemoteApp and Desktop Connections expectations, because Azure Virtual Desktop does not support those connection models.
My view now
The core idea behind the original article still holds up well. Microsoft-managed desktop virtualization infrastructure is a strong operating model, especially when you want to reduce the amount of broker, gateway, and control-plane plumbing your team owns directly.
What changed is the maturity of the service.
Azure Virtual Desktop is no longer a launch-era platform that needs special onboarding gymnastics. It is an Azure-native service with clearer resource boundaries, broader identity options, better client guidance, and a much cleaner architectural story.
That is the lens I would use when reading any old WVD launch article now:
- Keep the architectural intent.
- Discard the classic control-plane steps.
- Rebuild using the current Azure Virtual Desktop model.